1 Introduction In the production equipment with the programmable controller (plc) as the control system, the network structure of the server-client is often established, and the remote access of data between the two is extensive. Take the GE Fanuc 90 series programming software Cimplicity as an example to introduce its remote access function.
2 remote access
GE Fanuc's CIMPLICITY hmi software is based on Microsoft WINOOWs NT and WINOOWs 95. The remote access feature of WINOOWs NT or WINOOWs 95 allows a user running CIMPLICITY HMI software on the client to access the CIMPLICITY HMI project on the server via a modem. data. The specific steps are described below.
3 Remote access setup steps
3.1 Server Settings (WINOOWs NT)
For a server running WINOOWs NT and CIMPLICITY HMI server software, you need to install the remote access service, then configure the remote access server to start automatically, and then the user dials in from the client.
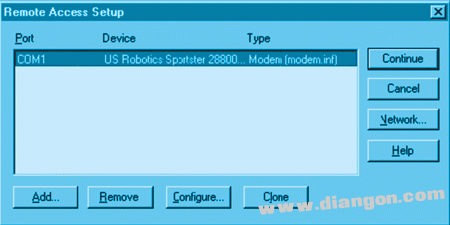
(1) Install the remote access service First open the Control Panel, double-click the Network icon, select the Services property page in the Network dialog box, and click Add. Select Remote Access Service from the list of services in the Select Network Service dialog, then click OK. The computer will start to install. After the software installation is complete, the Remote Access Setup dialog opens automatically, as shown in Figure 1:

Figure 1 Remote Access Setup dialog
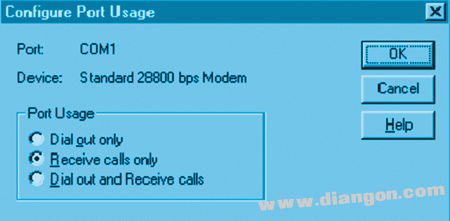
Select Configure and the Configure Port Usage dialog opens as follows.
For servers, the minimum choice for Port Usage is Receive calls only. After selecting the port usage for the modem, you can click OK to return.

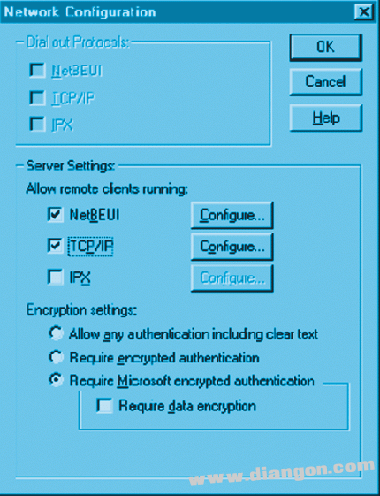
Then select Network. The Network Configuration dialog opens.

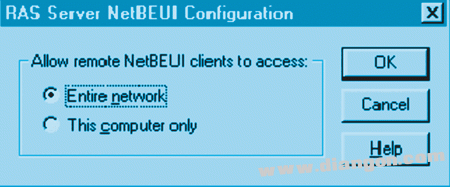
Be sure to select NetBEUI and TCP/IP in Server Settings. Then click on NetBEUI's Configure:

Select the required client access type in the RAS Server NetBEUI Configuration dialog and return. To configure TCP/IP, in the RAS Server TCP/IP Configuration dialog, under Allow remote TCP/IP clients to access, select the desired method. Select Use static address pool and enter two consecutive IP addresses from the network administrator in the Begin and End fields. The Begin address is assigned to the server's modem and the End address is assigned to the client. Select Allow remote clients to request a predetermined IP address. Then click OK to return. You need to restart your computer after making these configurations. You will also need to configure automatic startup and allow users to dial in from the client.
(2) The Startup Type configured to automatically start the remote access service is set to Manual at the time of installation. Need to change it to Automatic. Then first open the Control Panel, double-click the Services icon, double-click the Remote Access Server in the Services dialog box, select Startup Type as Automatic in its dialog box, click OK to return.
(3) Give the customer a dial-in permission. Select Administrative Tools from the Start menu, open the Remote Access Admin program, and select Permissions on the Users menu in the window. The Remote Access License dialog opens. In the dialog box, make sure that the user who needs to dial in as a customer is given a dial-in permission and can return.
3.2 Client Settings (WINOOWs NT)
For customers running WINOOWs NT (CIMPLICITY HMI Browsing Station), you need to install the remote access service before configuring the dial-up network.
(1) To install the remote access service, first open the Control Panel, double-click the Network icon, and select the Services property page in the Network dialog box. Click Add. In the Select Network Service dialog, select Remote Access Service from the server list and click OK. The computer will begin to install.
After the installation is complete, the Remote Access Setup dialog box will open automatically. Select Configure and the Configure Port Usage dialog box will open. Select the port usage of the desired modem. Generally, for the client, the minimum option for Port Usage is Dial out only. Return after setting. Then select Network to configure it. Here you need to ensure that Dial out Protocols is selected as NetBEUI and TCP/IP, and then return.
(2) After installing the remote access server, you need to further configure the dial-up network option. Open My Computer first, double-click the Dial-up Networking icon to add an item to the remote access server you want to connect to.
3.3 Client Establishment (WINOOWs 95)
For clients running WINOOWs 95 (CIMPLICITY HMI Browsing Station), first ensure that NetBEUI and TCP/IP protocols are installed. Steps: Open the Control Panel, double-click the Network icon, select the Protocols card, and make sure both protocols are installed. Then configure the dial-up network. Steps: Open the Control Panel, double-click the Add/Remove Programs icon, select the WINOOWs Setup card in the Add/Remove Programs Properties dialog box, select Communications, select Details, and in the Communications dialog, select Dial-up Networking. Then click OK. Click OK in the Add/Remove Programs Properties dialog. The computer begins to install the dial-up networking option. After the installation is complete, configure its properties. Open My Computer first, double-click the Dial-up Networking icon to add an item to the remote access server you want to connect to. Finally, configure the network properties, first open the Control Panel, double-click the Network icon, and select the Configuration card in the Open Network dialog box. Select TCP/IP->Dial-up Adapter and display its properties, then do the following:
(1) Prohibit DNS Configuration
(2) Keep Gateway blank
(3) For WINS Configuration, select DHCP for WINS Resolution
(4) Select Obtain and IP address Automatically
(5) For Bindings, choose Client for Microsoft Networks
(6) For Advanced, select None
Then select the Identification card, enter a name for the computer, click OK to close the Network dialog box, and save the changes.
The remote access customer has been established.
3.4 Configuring HOSTS Files Since the RAS connection does not support the broadcast mode of the CIMPLICITY HMI project, the IP address and node name of each computer (including the server and the browsing station) must be configured in the hosts file of other computers. For example: in the WINOOWs NT environment, you can find the hosts.sam file under C:WINNT35system32 driversetc. In the WINOOWs95 environment, you can find the hosts.sam file under C:WINOOWs, just put the hosts file in the same way as hosts.sam The directory can be.
4 Example This article uses the following configuration as an example:
Server: The name is Server61, and is equipped with Microsoft WINOOWs V4.0, CIMPLICITY HMI server software, modem, Ethernet IP address is 202.114.1.98, two consecutive IP addresses -202.114.1.90 and 202.114.1.91 - for configuring remote Access the service.
Client: Named Client62 and equipped with Microsoft WINOOWs95, CIMPLICITY HMI browsing station software, modem. The configuration diagram is shown in Figure 2:

Figure 2 System configuration diagram
4.1 Testing the Connection After dialing in from the client and establishing a connection, you can perform the following tests.
(1) Client test from the client to the computer name test server, as follows:
C:WINOOWS>ping Server61
Pinging Server61 [202.114.1.98] with 32 bytes of data:
Reply from 202.114.1.98: bytes=32 time=103ms TTL=128
Reply from 202.114.1.98: bytes=32 time=101ms TTL=128
Reply from 202.114.1.98: bytes=32 time=99ms TTL=128
C:WINOOWS
(2) Server testing can also test the client from the server, as follows:
C:WINOOWS>ping Client62
Pinging Client62 [202.114.1.91] with 32 bytes of data:
Reply from 202.114.1.91: bytes=32 time<10ms TTL=128
Reply from 202.114.1.91: bytes=32 time=1ms TTL=128
Reply from 202.114.1.91: bytes=32 time=1ms TTL=128
C:WINOOWS
4.2 Accessing the CIMPLICITY HMI Project from the Client
(1) Browsing a point When you open the Select A Point browser in CimEdit, the Project field is empty. To view the point on the server, you need to enter the server's computer name in the Project field, such as Server61.
(2) Opening a CimView Screen To open a CimView screen on a client machine that uses non-strictly formatted data points, you can use the /project command line option to indicate which project is running on the server that you want to access. The format is as follows:
Cimview /project
Here
Cimview/project Server61 C:CIMPLICITY HMISCREENS1.CIM
5 Conclusion In practical applications, WINOOWs may be used with a higher version of the operating system. The specific setup steps are not much different and will be easier. The remote data access function has been applied in actual engineering and the effect is good.
Facade Display,Led Outdoor Display Screen,Low Power Led Light Buried Lamp,Soft-Panel Stage Lighting
Kindwin Technology (H.K.) Limited , https://www.ktl-led.com