Some time ago, the project used 100 Mbps network communication, and used LWIP. At the beginning, it was transplanted with reference to the atomic routine. Because the atomic routine used LAN8720, in order to change to DP83848, change the register address and change the definition. Changed the speed calculation formula, tossed for many days and did not succeed. Finally, I had to follow the advice of the netizens and modify the ST official's routine. After a few days, it was successful. Now I will share the steps for everyone. I feel that the actual project uses DP83848. Still the most. In fact, this article is not a transplant LWIP, just to change the ST official routines into what our project needs, and then we can complete our own projects on this basis, which is more suitable for those who are new to LWIP and are eager to do projects. There is no need to understand the specific implementation of LWIP, it will be used. .
My project configuration: STM32F407VET6 + DP83848C
1. Download the STSW-STM32070 from the official website http:// The English document DM00036052.pdf and the package stsw-stm32070.zip for the demonstration code of the LwIP TCP/IP protocol stack for the STM32F4x7 microcontroller. stsw-stm32070.zip is based on the demo code official EVAL development board, obviously, we directly modify the code for this demo than we go to transplant LWIP much simpler LwIP TCP / IP protocol for STM32F4x7 microcontroller stack. DM00036052.pdf is the documentation for the demo code.
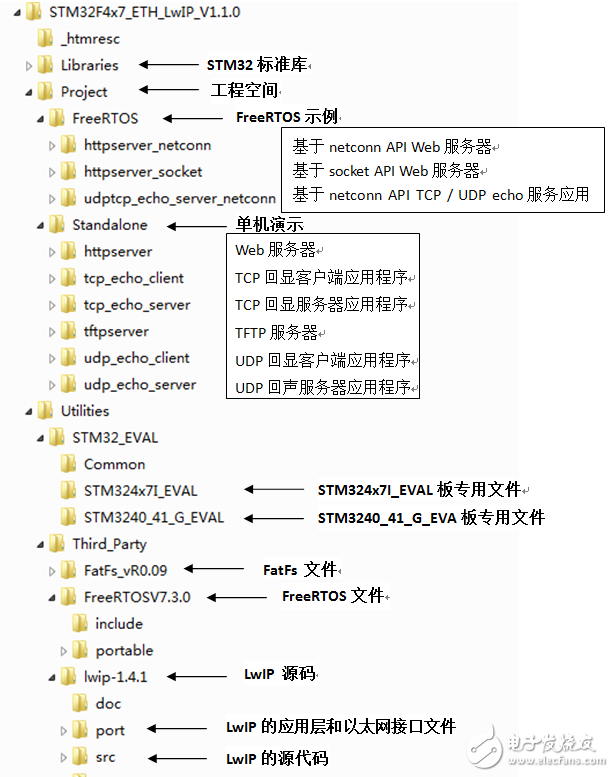
2. Decompress stsw-stm32070.zip to get the STM32F4x7_ETH_LwIP_V1.1.0 folder. The following is the STM32F4x7_ETH_LwIP_V1.1.0 folder structure.

3, delete the _htmresc folder, this folder is ST and CMSIS company logo, no use.
4. Open the project folder. This folder contains two folders: FreeRTOS and Standalone.
The program example in the FreeRTOS folder is based on the LWIP porting example of the FreeRTOS system. We do not need to delete it directly here.
In the Standalone folder, there are some operating system LWIP portless sample programs. Here we need normal data transfer, so we only use UDP, so we only keep the udp_echo_client folder, and the rest are deleted. In the udp_echo_client folder, the EWARM folder is the project created by IAR EWARM, and MDK-ARM is the project created by keil MDK. Here we choose the MDK project, the project created by IAR can be retained or deleted. There is also a folder RIDE, open to look at, it should be a project space built with another compiler software, here we do not need, delete directly.
5, UTIliTIes-"Third_Party folder has three folders FatFs_vR0, FreeRTOSV7.3, lwip-1.4.1. FatFs_vR0 is a general file system module for implementing FAT file system in small embedded systems. FreeRTOSV7.3 is a small embedded system with a mini operating system kernel. We can't use it here and delete it directly. The lwip-1.4.1 folder is the LWIP source code, which is what we need.
6, open the MDK project in the MDK-ARM folder, we compile first, you can see that there are 0 errors, three warnings, two of which are defined variables but not used, we do not care about it, another The warning is. .\. .\. .\. .\UTIliTIes\Third_Party\lwip-1.4.1\port\STM32F4x7\Standalone
\ethernetif.c(366): warning: #1-D: last line of file ends without a newline The last line of the ethernetif.c file (that is, line 366) has no line breaks. The last line of each file in MDK must be wrapped. Otherwise, a warning will be prompted. Here, after 366 lines are followed by a new line, the warning disappears.
7. Open the main.h file. Since we are using the RMII interface on the board, comment out #define MII_MOD and uncomment the //#define RMII_MODE as shown below:

It should be noted here that the RMII clock is 50MHz, and a 50MHz active crystal oscillator can be directly soldered on the board.
Cancel // # define USE_DHCP comments, enable dynamic address allocation, address assignment is not successful when you use a static IP address. Figure: 
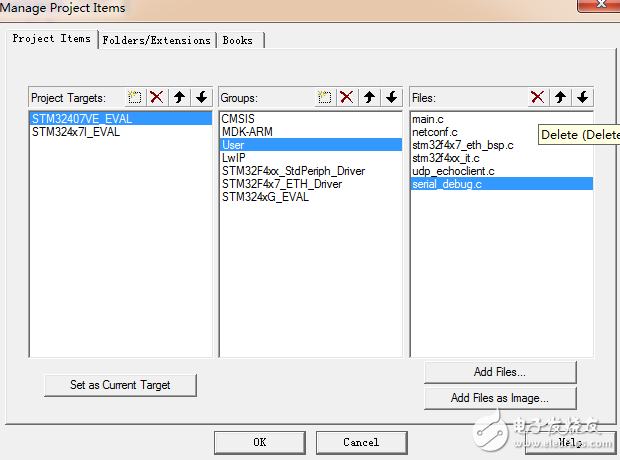
This project is deleted directly, because the SERIAL_DEBUG is deleted, so we can remove the serial_debug.c file from the project.

Click the red cross to delete serial_debug.c, then click OK.
The Groups column STM324xG_EVAL in stm324x7i_eval.c and stm324x7i_eval_lcd.c delete, delete the file startup_stm32f427x.s MDK_ARM start of the project Project Targets sub-column name STM324x7I_EVAL deleted, delete STM324xG_EVAL in stm324xg_eval_lcd.c, this is Something that has nothing to do with this project. At this time, the compiler will prompt an error. We will delete the header file containing the LCD function in the stm32f4x7_eth_bsp.h file, as shown below.
KENNEDE ELECTRONICS MFG CO.,LTD. , https://www.axavape.com